Create a Backup of your WordPress site – the Faster Way
How you should take your WordPress website backup? Do you have this question? Here is the faster and rock solid solution to your question. This will be a step by step guide to help you completely backup your website.
Why you need a website backup? Do you really need to put an extra effort in taking your WordPress website backup?
The short answer is YES.
Backup will be your best friend when your website becomes victim of hacking attacks or you accidentally delete important configuration files. Additionally, this method will also help you in hosting migration in future.
You might also want to read: Five Tips in Securing your WordPress site in 2016.
Let me give you an overview what we are going to perform:
- How to manually backup your entire website
- How to backup your database
- How to restore your website and database.
It will be a three easy step procedure. I will try my best to show you each step with an image to give you clear idea about what action you need to take.
Please note, we will not use any plugin or third party services in this approach. This will be a basic but concrete approach. We will be using CPanel for backup and FileZilla for restore.
So, let’s start the backup process without wasting much of your time.
1) How to manually backup your entire website:
To take complete backup of your website you need to login to your hosting CPanel. How would you do that? Type WEBSITE.COM:2082 and enter the credentials to login.

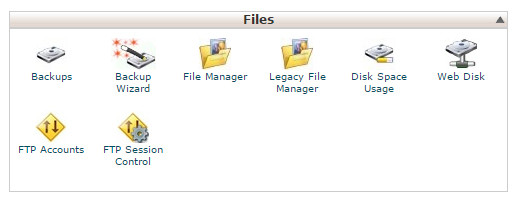
Navigate to the Files section as show in the image above and hit the Backups link. Clicking the link will navigate you to a new page like shown in an image below.

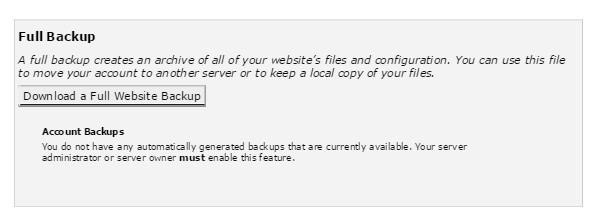
As we are creating a full website backup, so it’s obvious to hit the Download Full Website Backup button. Pressing the button will open a new page like an image below.

You see a dropdown for Backup Destination, keep the Home Directory. The other options includes Remote FTP Server and Remove FTP Server (Passive mode) these options are to transfer the backup file directly to other servers via FTP.
Our goal here is to take full website backup and download to your local computer. So, we better stick with Home Directory.
Now, hit Generate Backup button, it will create a compressed (in most cases .tar.gz or gzip archive) of your server’s root directory. How much time will it take to backup? Well, it depends on the number of files and size of your website. But couple of minutes would be enough for a server.
Keep your email address in Email Address field, once backup process completed you will receive an email when backup process completes. Please navigate back to Backups option in your CPanel, click the Download a full website backup button and you will see the latest backup listed like an image below.
Now what? Simply click the backup link and it will automatically start download the backup file. Again, the time will depend on your internet speed and size of your backup file.
Congratulations, You have successfully downloaded the complete backup of your website.
See this article to learn how to speed up your WordPress site.
2) How to Backup the Database:
Your website is based on WordPress meaning you have at least one active database backing up your WordPress website. After backing up your website files it’s now time to have a complete database backup.
How would you take the database backup? Here is the easier way. This step will also uses the CPanel backup option we seen earlier in the article.

Now go back CPanel, to the Backup option. Here, you will find a Download a MySQL database backup option in the page. It should look like an image shown below.
It should list all the databases you have created. If you have a simple WordPress website setup you may have one database listed here. If you have more than one database listed here don’t worry you can download all the databases.
To download a database all you need to do is just click on the database name link and it will download the database backup file (in most cases.sql.gz) file.
Great! Now you have both the complete website backup and database(s) backup in place and on your computer. Now remember, in case any problem such as accidental deletion or hacking attempts – you now have strong back up of your data.
3) How to restore your website:
I hope you have took the backup of your website files and database(s) as shown in the previous part. Now let’s get the restore part done.
I consider we are going a fresh start with your website for restoration process. Meaning you have deleted files from your server. Or you are switching to new hosting server.
You have complete website backup on your computer in backup-name.tar.gz we will need to upload that file to your webserver. You can upload using CPanel or in case your have large backup file you can consider FTP to upload the file.
I have uploaded a backup file to my server as you can see in the image above. Now is the time to extract that compressed backup file into your server.
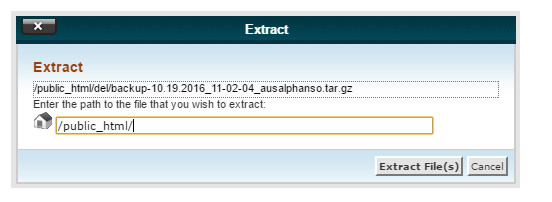
Select your backup file as I did in the image earlier and hit the Extract icon. It will ask you for the location like the image shown below. Make it /public_html/ and hit Extract File(s) button.
Done! You have restored your backup website files to your web server. It includes all the configuration, media and all the files you had on your server while taking the backup.
There are many tutorials on how you can back up your entire website files. Alternatively, you can use offsite backup solutions offered by brands like Zerto, Backblaze, Umbrellar Offsite Backup, Livevault and more.
Let’s restore the database:
If you are restoring a database on new hosting or in other words you can’t see any database listed in this section. You may first need to create a database from CPanel. If you already have database listed please proceed.
Head over to the Backups section on your CPanel. You should be able to see the Restore a MySQL Database section like shown in the image above.
You need to hit the Choose File button and choose the data-base-backup.sql.gz file you downloaded on your computer. Now hit the Upload button. This operation will restore the database.
That is the pretty much all the steps you need to backup and restore your WordPress or any CPanel hosted website.
You might also find this interesting: Beginners guide on how to setup WordPress.
Conclusion:
When you have CPanel for web hosting management. The backup and restore of your website becomes so easy. This is by far the most basic yet very powerful procedure. This also helps you migrate your website to new hosting provider as well.


