Learn How to Create WordPress Child Themes
To quote the WordPress codex on child themes. “A WordPress child theme is a theme that inherits the functionality of another theme, called the parent theme, and allows you to modify, or add to, the functionality of that parent theme.”
For Developers
Create a parent theme that is a framework of common items used on all of your WordPress sites. Functions (such as shortcodes), styles (images, comments, etc) and so on. Then create a child theme for each build. Keep your parent theme/framework up to date and all of your commonly used items are organized, all in one place allowing you to make updates to your framework easily.
For Premium Theme Users
If you have made any modifications to a premium theme and decide to update it, all those changes are in jeopardy of being overwritten by the update. Using a child theme for your customizations allow you to keep the parent (premium) theme intact while still customizing it to your needs.
For the purpose of this post I will use the Maximum Theme as an example parent theme. This example also assumes you are comfortable creating and editing WordPress files. Setup a new base WordPress install and copy the Maximum Theme to the themes directory (usually wp-content/themes/).
Creating a child theme
To create a child theme make a new folder in the themes directory and name it Max_Child.
The only requirement for a child theme is a stylesheet (style.css). Enter your newly created directory and make a style.css stylesheet file and open it in your favorite editor/IDE.
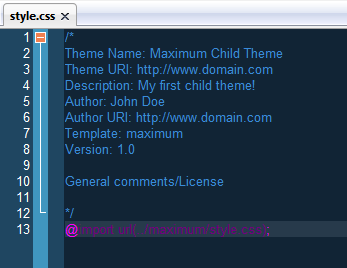
At the top of your style.css file you need to create a comment naming your child theme. You will want to update the dummy fields below with your information.
/*
Theme Name: Maximum Child Theme
Theme URI: http://www.domain.com
Description: My first child theme!
Author: John Doe
Author URI: http://www.domain.com
Template: maximum
Version: 1.0

General comments/License

*/
By default any files you create (with the exception of functions.php) will overwrite the parent themes equivalent. With that in mind the next line in your style.css file should be
@import url(../maximum/style.css);
This will import the Maximum stylesheet. Anything you put in your stylesheet will overwrite the parent theme’s styles. Want to change the menu font, link color, etc? No problem. You can now do it easily in your child theme without worry of being overwritten by an update to the parent theme.
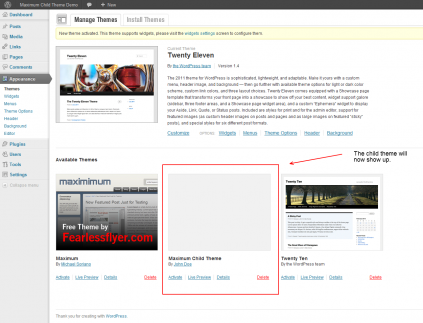
At this point you have a working child theme which can be enabled in the WordPress admin menu. If you would like a screenshot to show up you can either copy the maximum screenshot to your child theme directory (wp-content/themes/Max_Child/) or create your own. The only requirement is that the image file be named screenshot.jpg and should be 300px by 250px.
If you want to modify any other part of the parent theme simply copy a file and paste the file into your child theme and then edit away. The only exception (as mentioned above) is functions.php. WordPress will load the child theme’s functions.php file first, and the parent theme’s functions.php second.
Getting your hands dirty
To show an example of a possible customization with a child theme I am going to show you how to add a lightbox effect to images in the content.
Adding images to a post
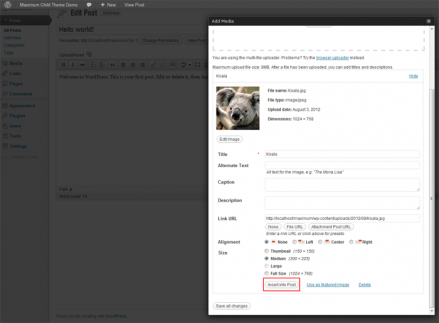
To get started add an image to the default Hello world! post. To do do this visit the edit post screen for Hello world! and click on Upload/Insert (top left of the editor). Drag an image into the uploader and give it a title then click Insert into Post at the bottom.
Click View Post and you will see your image on the front-end of the site. You will notice that when you click on the image you will be redirected to the location of the image. Adding a lightbox effect to images will make the image popup rather than being redirected from the post to view a larger version.
Download the lightbox files
My lightbox of choice is prettyPhoto and is what I will be using here. After you download prettyPhoto create a new folder in your child theme directory and name it prettyPhoto and extract the prettyPhoto files here. You will need the folders css, js and images. The index.html and readme files are not needed (but are worth a look if you aren’t familiar with prettyPhoto).
Register prettyPhoto with WordPress
I will not go into details about the WordPress functions for doing this but if you would like to know more you can see my article on Properly including javascript and css files in WordPress. The only notable change is that we are using the get_stylesheet_directory_uri() function. This is because calling template directory will reference the parent theme.
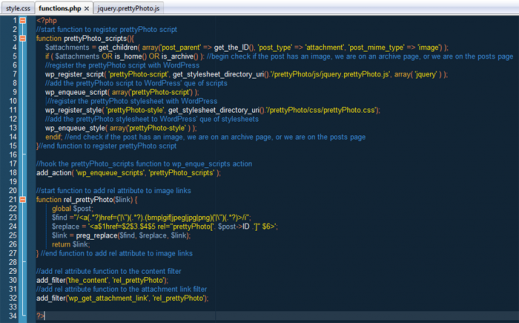
Create a functions.php file in your child theme directory, open it in your favorite editor and add the code below:
//start function to register prettyPhoto script
function prettyPhoto_scripts(){
    $attachments = get_children( array('post_parent' => get_the_ID(), 'post_type' => 'attachment', 'post_mime_type' => 'image') );
    if ( $attachments OR is_home() OR is_archive() ): //begin check if the post has an image, we are on an archive page, or we are on the posts page
    //register the prettyPhoto script with WordPress
    wp_register_script( 'prettyPhoto-script', get_stylesheet_directory_uri().'/prettyPhoto/js/jquery.prettyPhoto.js', array( 'jquery' ) );
    //add the prettyPhoto script to WordPress' que of scripts
    wp_enqueue_script( array('prettyPhoto-script') );
     //register the prettyPhoto stylesheet with WordPress
    wp_register_style( 'prettyPhoto-style', get_stylesheet_directory_uri().'/prettyPhoto/css/prettyPhoto.css');
    //add the prettyPhoto stylesheet to WordPress' que of stylesheets
    wp_enqueue_style( array('prettyPhoto-style' ) );
    endif; //end check if the post has an image, we are on an archive page, or we are on the posts page
}//end function to register prettyPhoto script

//hook the prettyPhoto_scripts function to wp_enque_scripts action
add_action( 'wp_enqueue_scripts', 'prettyPhoto_scripts' );
?>
The reason for the conditional is so that we only register prettyPhoto on pages/posts that it is needed. We check if the post has at least 1 image attachment, we are on the home (posts) page or on an archive page. You can add any other pages you need the lightbox effect on here such as search results, custom post types, etc.
Adding the rel attribute to image links
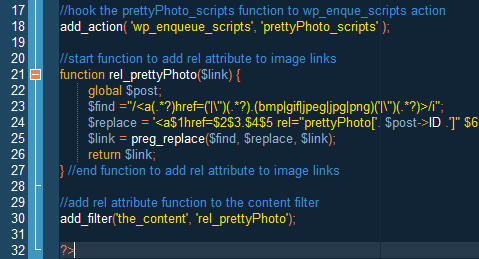
Next we are going to add another snippet to our child theme’s functions.php file (right above the closing php tag) that will add rel=”prettyPhoto[postID]” to links around images. Placing post ID in the rel attribute ensures that prettyPhoto will group all the images from a post together in the lightbox.
//start function to add rel attribute to image links
function rel_prettyPhoto($link) {
       global $post;
       $find ="//i";
       $replace = '';
       $link = preg_replace($find, $replace, $link);
       return $link;
} //end function to add rel attribute to image links

//add rel attribute function to the content filter
add_filter('the_content', 'rel_prettyPhoto');
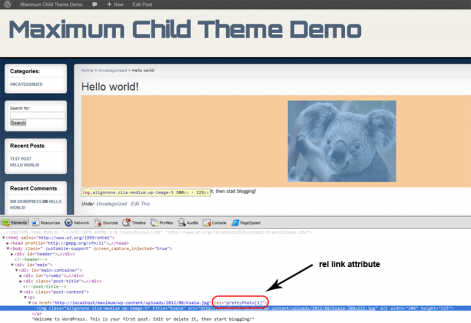
Now when you inspect an image with a developer tool (like firebug) you will see the rel attribute is now part of the link.
Associate rel=”prettyPhoto” with the prettyPhoto function
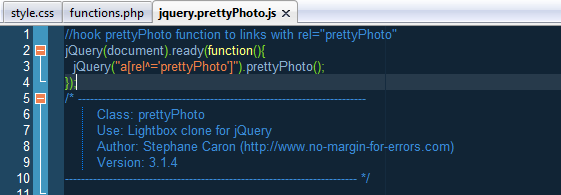
The only thing left to do is to tell prettyPhoto to look for links with rel=”prettyPhoto”. To do this open the prettyPhoto js file (wp-contentthemesMax_ChildprettyPhotojsjquery.prettyPhoto.js) and add this code to the very top.
//hook prettyPhoto function to links with rel="prettyPhoto"
jQuery(document).ready(function(){
  jQuery("a[rel^='prettyPhoto']").prettyPhoto();
});
Testing It Out
Now that our child theme is set, our functions.php is in place, rel tags are showing – and javascript is added – its time for some testing.
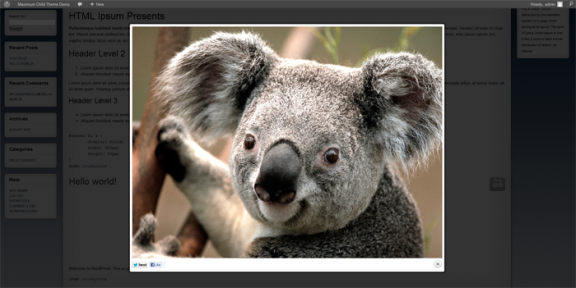
Visit your homepage and click on the image we inserted at the beginning and it will now come up in a lightbox rather than redirecting to the image’s location on the site.
Bonus: Adding lightbox functionality to the WordPress gallery
If you want to use WordPress’ built in gallery instead of inserting images to a post one at a time we need to update the gallery to insert the rel=”prettyPhoto” attribute to it’s links. Luckily the function for this is already written. Just add this code to the end of your child theme’s functions.php file (just above the closing php tag).
//add rel attribute function to the attachment link filter
add_filter('wp_get_attachment_link', 'rel_prettyPhoto');
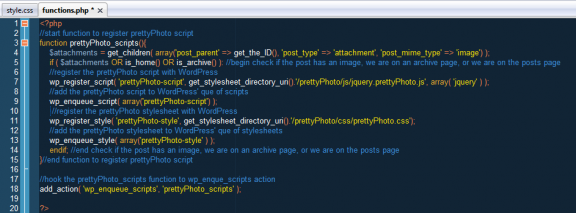
Your functions.php file should now look like this:
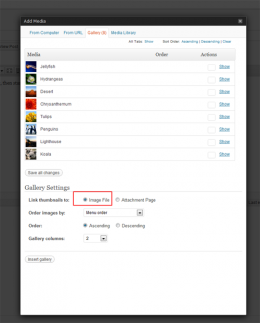
Just make sure when you insert a gallery to choose Link thumbnails to image file.
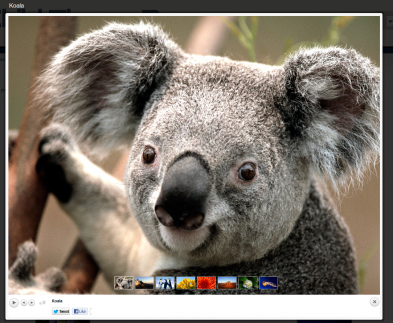
Now when users click on an image in your gallery they will be displayed in the lightbox where they can be scrolled through.
Conclusion
Hopefully you understand that by creating a child theme you can separate your customizations from the parent theme and keep everything clean. Not to mention keeping your additions safe in case the parent theme gets an update! The prettyPhoto lightbox portion of this tutorial can be applied to any theme, not just a child theme. You will find the finalized child theme files attached to the post. Feel free to use them in your projects.

